
This post may contain affiliate links. Please read our disclosure policy
This Oven-Roasted Turkey Recipe is crispy on the outside, cooked to perfection and slathered in a delicious herb-and-garlic compound butter. It’s as fool-proof as it gets. Complete with a super quick, easy and aromatic gravy that uses up all the pan drippings and happens to be gluten-free. The secret? Breakdown the turkey beforehand and roast the pieces individually!

What You Need for this Oven-Roasted Turkey Recipe
- Turkey: For best flavour, source a free-range, young turkey raised without antibiotics or hormones. You can ask your butcher to breakdown the turkey for you or you can do it yourself at home. If your butcher does it for you, ask him to include the neck, giblets and carcass. I like to add them with the aromatics at the bottom of the roasting tray under the turkey, but you can also use them to make a homemade stock.
- Compound Butter: Slathering the top of each piece of turkey with a delicious herb and garlic compound butter will add a ton of flavour and also promote some browning on the skin. I like to use a combination of fresh parsley, rosemary, thyme, sage and garlic.
- Smoked Paprika: After spreading the compound butter over each piece of turkey I like to season them with smoked paprika. It adds a nice colour and also gives a slight hint of smokey flavour.
- Aromatics: Adding some chopped carrots, celery, shallots, leek and garlic to the bottom of the roasting tray will give the gravy a ton of flavour.
- Baking Soda: Adding a small amount of baking soda to your dry brine will raise the pH level, creating a more alkaline environment, and help break down proteins on the skin’s surface, contributing to a crispier texture. Just be sure not to use too much or it will alter the flavour of the turkey. For a 10-12 pound bird, I use one teaspoon.
- Chicken Bone Broth: For the tastiest gravy, use bone broth. Not only is it more flavourful, but it has collagen, which will give the gravy a much glossier and richer consistency. I like to use Kettle and Fire because they taste great, are super convenient and made with all-natural, organic ingredients. There are no fillers, colourings, artificial flavours, wheat fillers or refined sugars.
- Cassava Flour: To keep the recipe gluten- and grain-free, use cassava flour instead of regular wheat flour to make the roux to thicken your gravy.

Why the Deconstructed Roasted Turkey Technique Works
This oven-roasted turkey recipe is low-effort, maximum reward and perfect for those that tend to leave things to the last minute. It’s also way easier to carve than a whole-roasted bird.
- Increased Surface Area: Roasting the turkey in individual parts increases surface area, resulting in more browning and even cooking.
- Faster Cooking Time: The deconstructed technique also allows the turkey to cook quicker. A 10-12 pound bird can roast in a little over 1 hour and come out perfectly juicy.
- More Control: If you notice that the skin on one piece of turkey is getting more brown than another, you can flip it over or move its position on the rack for more even cooking. This technique also allows you to remove parts from the oven that cook quicker, such as the wings.
- Easier to Carve: Because the bird is already broken down, all you need to do is carve the breast and thighs before serving. It’s much more manageable then trying to carve a whole-roasted turkey.
Should You Brine the Turkey?
If you do only one thing to prep for this oven-roasted turkey recipe, it should be brining it. You can either use a wet brine, which is essentially a salt water solution, or a dry brine, which basically means you salt the turkey for an extended period of time and leave it uncovered in the fridge. Wet brines and dry brines each have their pros and cons. I tend to prefer dry brines for a few reasons.
Wet Brines:
Wet brines are great but for an 18 to 20-pound turkey you’re going to need two things: a big enough food-safe bucket to fully submerge the turkey in its brine, and somewhere to keep it cold until it’s ready to cook (usually 24 hours later.) Most refrigerators, especially ones that are full with other foods necessary for Thanksgiving, won’t accommodate the space needed for such a big bucket. Let alone tiny apartment fridges like the one I had for a year while living in a condo.
It is possible to brine a turkey in a large cooler, but to do this you’ll need to keep a watchful eye on the temperature of the brine, adjusting it with ice every so often to ensure it does not drop below a food-safe temperature. This tends to be quite a bit of work and can get messy when trying to discard the water after brining.

Dry Brines:
Dry brines, as the name suggests, do not involve any liquid. Instead, it simply means that the turkey (or any other protein you’re using) is salted for an extended period of time. Like a wet brine, you can incorporate different herbs, spices and flavourings into your dry brine to a similar effect. The salt on the surface of the turkey will pull moisture out from the bird and then push it back in through a process osmosis. Like a wet brine, a dry brine keeps the turkey moist and prevents it from drying out, and it also seasons the meat more deeply and evenly.
I also prefer dry brines because you can include a dash baking soda, which will help promote browning and crispy skin.
The downside of a dry brine is that they don’t necessarily do as good of a job as a wet brine because you are relying solely on the available moisture already present in the turkey. Nevertheless, I can tell you from personal experience that a dry brined turkey is really, really delicious. Especially when you’re going for smoked turkey. So, even if you can’t accommodate a wet brine, you should absolutely dry brine your turkey.
Quick and Easy Thanksgiving Turkey Gravy
You can absolutely make a homemade stock the day before Thanksgiving. It will taste great, have your house smelling like the Holidays, and you can use it for gravy, stuffing, green bean casserole, and mashed potatoes.
If you want to make your life much easier and save lots of time, grab a few cartons of Kettle & Fire Regenerative Chicken Bone Broth. These broths are made with all-natural, organic ingredients and chicken bones raised using regenerative farming practices. It results in a better tasting broth and supports the environment and healthier food systems.
To boost the flavour of this oven-roasted turkey recipe even more, add some aromatics like carrot, celery, shallot, leeks, garlic and fresh thyme to the bottom of the roasting tray so that they cook in the turkey drippings. I also like to add the turkey neck and giblets to the pan.
After the turkey is done roasting, add the roasted vegetables to a sieve set over a bowl and press them down to extract as much juice as possible. Reserve all of these drippings and use them to deglaze the roasting pan for the gravy.
If you don’t have a stovetop-safe roasting dish, you can make the gravy in a sauce pan.


Can You Roast the Turkey on a Traeger Grill?
You can absolutely cook this turkey recipe on your Traeger Grill. In fact, I would recommend it! You’ll get an irresistible hint of wood-fired flavour that you can’t replicate in the oven. Cooking the turkey on your Traeger would also free up some valuable oven space.
If you plan to cook this oven-roasted turkey recipe on your Traeger, you can keep the same temperatures and times listed in the instructions below.
You can also cook many other signature Thanksgiving side dishes on your traeger, like my Chorizo & Green Bean Casserole or Wild Boar & Sourdough Stuffing.
What Specialty Equipment Do I Need for this Recipe?
To roast the turkey, you will need a large roasting pan that is oven-safe and stove-top safe, as well as a heat-safe wire rack that sits on top of it.
Ideally, the wire rack should be large enough that it can fit the entire deconstructed turkey in a single layer – if pieces overlap it will prevent them from their browning. Keep in mind that as the turkey roasts, it will reduce in size a little bit, leaving some space between each piece. So, if the pieces are just touching at first, that should be fine.
The roasting pan beneath the wire rack should also be large enough to catch the turkey drippings from each piece as it roasts. I have an old extra-large roasting pan that I picked up years ago at a kitchen supply store. You can find many options on Amazon – such as this 16″ Cuisinart roasting pan that has great reviews and looks like it will fit a 10 to 12-pound bird.
Keep in mind that the turkey you see in my video was a young bird that was only around 12-pounds. If you’re roasting something larger, you’ll obviously need larger cookware to support it.
If you can’t find a roasting pan and cooling rack that is large enough to support the entire deconstructed turkey, you can use two medium size roasting pans and evenly distribute the aromatics and vegetables to each.
Another important thing to mention is that you ideally want the cooling rack to be slightly wider than the roasting pan itself. That way, it will sit on top of the outer rim, allowing for hot air to flow underneath the bird and to the vegetables below. If you can’t find a cooling rack and roasting pan combo that achieves this, don’t worry too much. You can still make the recipe. It’s just that there will probably be a bit more steam created in the process, which won’t result in as much browning on the vegetables.
Oven-Roasted Turkey Recipe and Gravy – Paleo, Grain-Free
Ingredients
- 1 whole 10 to 12-pound bone-in and skin-on turkey, broken down into individual breasts, thighs, drumsticks and wings
- 2 tablespoons kosher salt
- 1 teaspoon freshly-cracked black pepper
- 1 teaspoon baking soda
- 8 ounces room-temperature, grass-fed butter, substitute ghee
- ¼ cup fresh parsley
- 2 tablespoons fresh rosemary, plus extra for garnish
- 2 tablespoons fresh thyme, plus extra for garnish
- 1 tablespoon fresh sage, plus extra for garnish
- 10 cloves garlic, divided, lightly smashed with skins on
- 1 tablespoon smoked paprika
- 2 medium carrots, roughly chopped
- 2 ribs celery, roughly chopped
- 2 medium shallots, halved
- 1 leek, roughly chopped, green tops removed
- 2 tablespoons cassava flour
- 17 ounces Kettle and Fire chicken bone broth, plus more as needed
Instructions
- The day before cooking, place the turkey parts onto a large sheet pan lined with a metal rack. In a bowl, combine the salt, pepper and baking soda and mix to incorporate. Evenly season all sides of the turkey parts. Transfer the sheet pan to the fridge and refrigerate, uncovered, for 8 to 24 hours.
- Remove the turkey from the fridge one hour prior to cooking. Preheat the oven to 425F.
- In a food processor, combine the room-temperature butter, parsley, rosemary, thyme, sage and 4 garlic cloves. Blend until smooth and well combined. Transfer the compound butter to a small bowl and set aside.
- To the bottom of a large roasting tray, add the carrots, celery, shallots, leek and remaining 6 garlic cloves. If you have the turkey neck or giblets, add them. If you have a few extra sprigs of fresh thyme or rosemary, you can add those as well.
- Place the wire rack with turkey pieces overtop of the vegetables. Pat the turkey dry with paper towel and use a spoon to slather the compound butter over each piece of turkey. Season the tops with smoked paprika.
- Transfer the roasting pan to the oven. Immediately lower the heat to 375F and cook, flipping the turkey pieces halfway, until the thickest part of the breasts and thighs register between 160F-165F, around 1:15hrs. Transfer the turkey to a tray, tent with foil to keep warm and let rest at least 30 minutes before carving. If you used the turkey neck and giblets, transfer them to a separate bowl for nibbling or reserve for stock.
- Place a sieve overtop of a 4-cup measuring bowl. Add all of the roasted vegetables to the sieve and use a large spoon to press out all of the juices. Pour the turkey drippings through the sieve as well and let it sit for 15 minutes to allow the fat to separate from the juice.
- Place the roasting pan over a medium-low heat and ladle 4 tablespoons of the rendered turkey fat that has settled at the top of the measuring bowl. Discard the remaining fat. Heat the fat until shimmering and add the cassava flour. Cook, stirring, until the flour is golden, around 2 minutes. Pour in the reserved turkey dripping and cook, lifting any brown bits on the bottom of the tray, until the liquid has reduced by ¼ in volume. Add the Kettle & Fire Chicken Bone broth and cook, stirring regularly, until smooth and the gravy can coat the back of a spoon, 10 to 12 minutes. Taste the gravy for seasoning and adjust with salt and pepper as desired. Pour the gravy into a gravy boat or tea kettle to keep warm.
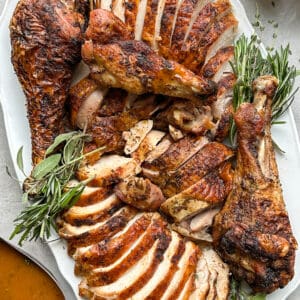
- Carve the turkey breasts and thighs and arrange everything onto a large serving platter. Garnish with fresh thyme, rosemary and sage sprigs and serve with the gravy.
Video
About the Author
Hi, i’m Ronny! In 2013, after a lifetime of struggling with my weight and body issues, I rehabilitated my relationship with food, lost over 40 pounds and completely changed my life.


Do you have a video on best practices for cutting down the turkey?
Love the recipe! Any tips to prevent the drippings and the veggies from burning in the bottom of the roaster?
This turkey was a show stopper- visually pleasing, incredible tasting. If I’m the one making Thanksgiving turkey, this is what I’m cooking!
The dry brine made the meat too salty. I would try it again without the brine.